Vehicle Setup Guide #
This guide assumes you have your vehicle working according to the Creating Vehicles section.
If you're modifying the values in runtime in the Editor, remember to backup your values before exiting Play mode. Either note them down to paper, or use the Copy Component / Paste Component Values options in the component's context menu.
All magnitudes use International System of Units (SI)
Unless explicitly noted otherwise, all magnitudes in Vehicle Physics Pro are in SI units:
- Mass and weight are kilograms (Kg)
- Distance is metres (m)
- Speed is metres per second (m/s)
- Acceleration is metres per second squared (m/s²)
- Angular velocity is radians per second (rad/s) or rpm when specified
- Force is newtons (N)
- Torque is newtons-metre (Nm)
Mass #
Configure the vehicle's mass in its Rigidbody component.
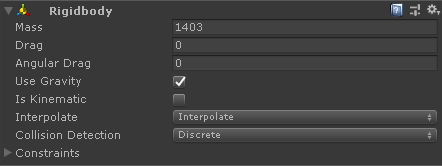
This mass represents the total mass of the vehicle in driving conditions as if we put it on a scale, including driver, passengers, fuel, wheels, cargo, etc.
Center of Mass #
Add a GameObject to the vehicle and name it CoM. Configure it in VPVehicleController >
Center Of Mass.
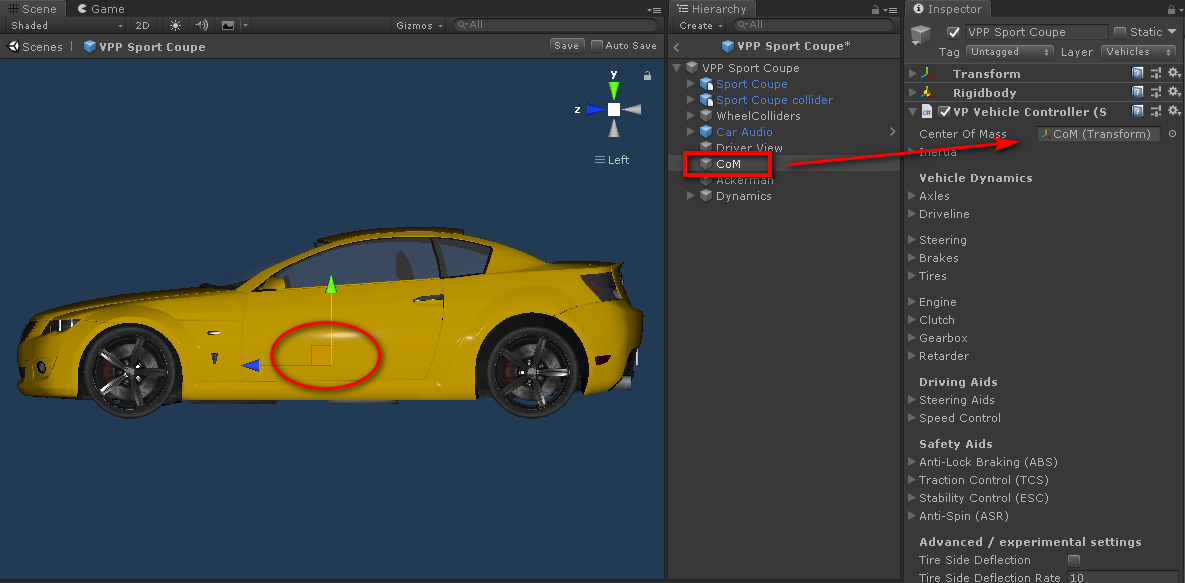
Longitudinal position of the CoM (Z):
- Start at the mid-point between the vehicle's axles.
- Move it slightly towards the position of the engine.
- If the specifications include the weights on each axle you may use the component
VPWeightDatafor displaying the weights per axle in runtime. Move the Z position of the CoM while watching at the values until they match the specification.
Vertical position of the CoM (Y):
- A rough estimation is slightly above the chassis.
- It can also be estimated by watching a similar vehicle in equilibrium on two side wheels (as in this video).
- If you're lucky you might find this value as Center of Gravity Height in the vehicle specifications.
- Related articles:
The sideways position of the CoM (X) should be 0 (middle of the vehicle).
After configuring the CoM you may need to make adjustments to the suspension for accommodating the new weight distribution. Typically:
- The spring rates should be adjusted so all suspensions reach the same compression ratio at rest.
- The damper rates should also be fine tunned proportionally to the weight they're supporting.
Inertia #
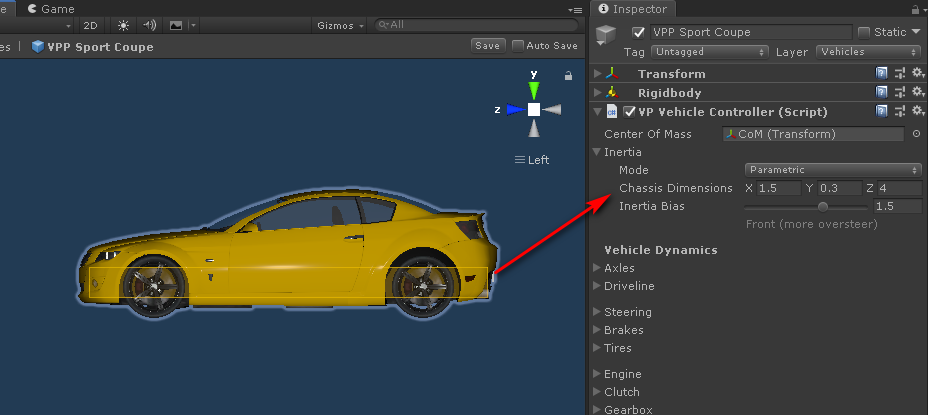
Inertia plays a critical role in the handling of the vehicle. Configure the inertia in the section
Inertia of VPVehicleController.
As initial configuration:
- Choose Parametric.
- Configure the X and Z dimensions to roughly match the vehicle's dimensions (no matter if the box gizmo spans beyond the visual vehicle).
- The Y dimension should match the lower part of the vehicle. If the vehicle heavily shakes then increase this dimension.
- Configure Inertia Bias based on the position of the engine in the vehicle. Standard cars use between -1.5 and +1.5. Use small positive values for front engines, and small negative values for rear engines.
More details and information on configuring the Inertia: Inertia Helper
Suspension #
The suspension is configured per-wheel at the VPWheelCollider components.
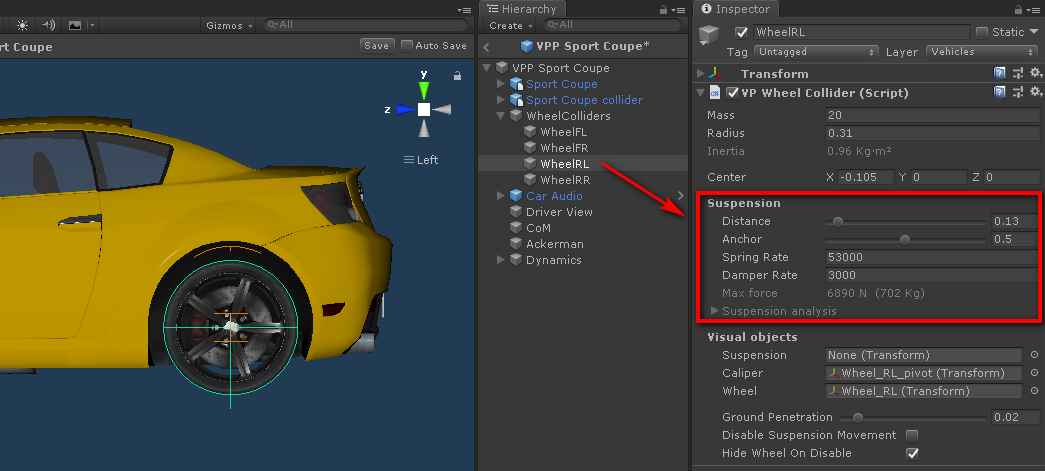
The suspension distance (m) should be configured for matching the vehicle's specifications. If these aren't available, try to figure out the complete travel distance of the suspension based on observations in the real vehicle.
The anchor (%) simply defines how much the suspension is currently compressed in the 3D model.
- 0 means the suspension is fully extended and can only be compressed from the original position.
- 1 means the suspension is fully compressed and can only be extended.
- 0.5 means the suspension is half compressed.
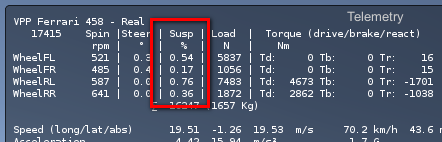
You can monitor the compression of the suspension in real time in the Telemetry window (VPTelemetry
component) Susp column.
Warning
The compression values as shown in the Telemetry should never reach 1.0 or adverse physics effects may occur. This is by PhysX design/bugs and there's nothing we or Unity can do.
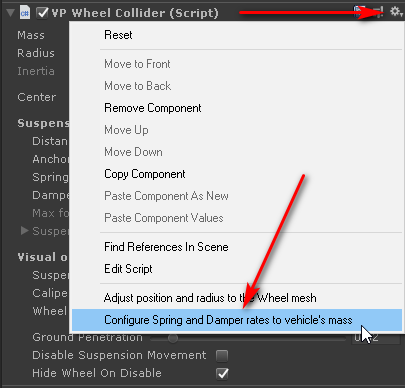
Springs and dampers #
The VPWheelCollider component includes an option to configure both spring and damper based on the
vehicle's mass, the number of wheels and the suspension distances:
Springs sustain the weight of the vehicle. A good starting point is configuring the spring rate (N/m) so each suspension can support up to twice of the distributed weight. Thus, if the weight is evenly distributed then each suspension would be at half of its travel at rest.
The rule of thumb for the spring rate is:
Spring Rate = vehicle mass / number of wheels * 2 * 9.81 / suspension distance
You can always use real spring rates or any other values that fit better with your vehicle.
Dampers (or shock absorbers) limit the suspension movement and damp the spring oscillations. The damper setup affects the angular momentum of the vehicle on weight shifting situations (accelerating, braking, cornering...).
The damper rate (N/ms-1) should be configured so the oscillating behavior resembles the real vehicle.
The rule of thumb is for the damper rate is:
Damper Rate = Spring Rate / 20
You may use a VPResetVehicle component to drop the vehicle from some height
(Enter key), then observe how the suspension oscillates. Configure the damper rates until
the result looks good enough for your vehicle.
Engine #
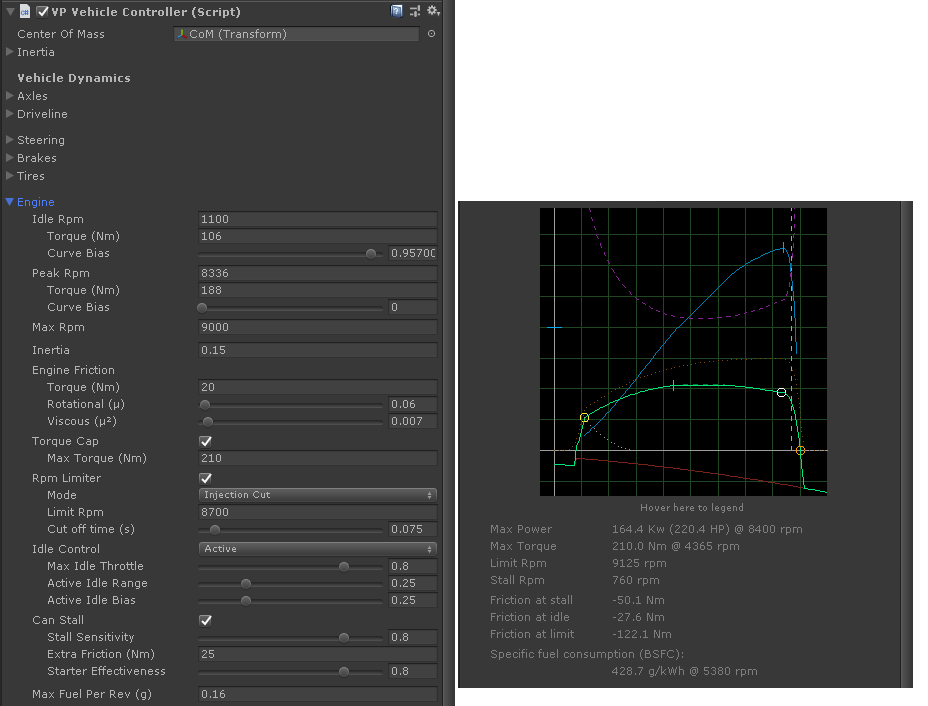
The engine torque curve is the sum of two curves: ideal torque curve (dotted orange) and friction torque curve (red). The result of adding those curves together is the final engine torque curve (green). When you watch at a dyno torque curve you're really watching this green curve.
The final torque curve (green) is guaranteed to cross three key values:
- Idle (yellow circle): rpm and torque (Nm) at idle.
- Peak (white circle): rpm and torque (Nm) where the ideal engine produces the maximum torque. This not necessarily the same point where the maximum final torque is reached.
- Max (orange circle): rpm where the resulting torque becomes zero.
The Curve Bias parameters have some influence in the transitions between Idle and Peak.
The inertia defines how much "effort" takes to modify the rpm in the engine. Formula 1 style engines have very little inertia (0.1-0.2), while trucks have a large inertia in their engines (8-10). Standard cars are around 0.3 and 1.
The Engine Friction (red curve) produces the engine brake effect when no throttle is applied. It's defined by a base Torque (Nm) and two coefficients of friction, Rotational () and Viscous (). The effect of these parameters can be lively observed in the graph.
Torque Cap clamps the torque curve (green) with the given value. This simulates an electronically imposed torque limit.
Rpm Limiter limits the rpm the engine can reach.
The Idle Control configures the extra torque required to keep the engine running. Also provides smooth throttle values near the idle rpm (dotted white curve).
If the engine Can Stall the parameters can be configured as well:
- Stall Bias: how "easy" is to stall the engine once the rpm fall below the idle value. 0 means the engine is hard to stall. 1 means easy to stall.
- Extra Friction (Nm): a stalled engine increments the engine friction by this value.
- Starter Reliability: how "easy" is to the starter (K key by default) to start the engine. 0 won't likely be able to start the engine. 1 will quickly start the engine. Intermediate values (depending on the actual engine settings) gradually add some difficulty and random factor.
Pro-Tip
The Starter Reliability can be used to simulate external factors such as drained batteries, cold temperatures, mechanical failures, and so on.
Pro-Tip
As happens in reality, a stalled engine can also be restarted inertially. That is leaving the vehicle running down a slope in neutral, then engaging a gear and releasing the clutch.
Clutch #
There are two main types of clutch in VPP:
- Friction Disc
-
A disc plate clutch typically used in cars with Manual transmission, where the clutch is operated via clutch pedal.
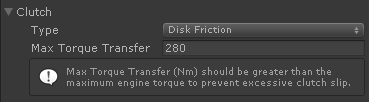
Max Torque Transfer defines the maximum amount of torque that can pass trough the clutch. A good value is around 1.5 times the maximum torque the engine can produce (Max Torque in the Engine's specifications).
- Torque Converter
-
A fluid coupling device typically used in cars with Automatic transmission.
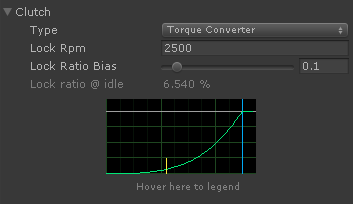
Lock Rpm is the engine rpm where the torque converter produces a full lock. A good value produces a lock ratio at idle around 6-10% (Lock ratio @ idle in the inspector).
Pro-Tip: Automatic clutch in Manual Transmissions
The Torque Converter may also be used with the Manual Transmission. This effectively provides an automatic clutch in cars with manual transmission, which is great for the gameplay when the car is controlled via keyboard, gamepad, or devices without clutch pedal.
Transmission #
The transmission is configured in the Gearbox section.
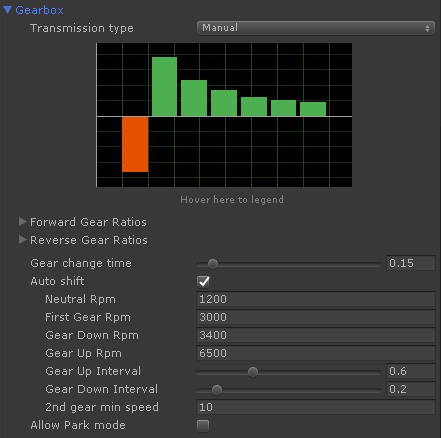
The Transmission type can be either manual or automatic:
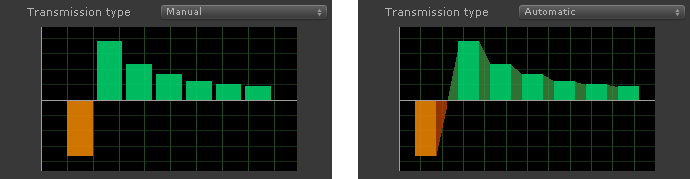
- Manual
-
Gears are engaged individually with a minimum interval among each change (Gear change time (s)) where the gearbox passes thru Neutral.
- Auto shift is also available in Manual transmissions.
- Both clutch types (clutch and torque converter) are well supported in Manual Transmissions.
- Automatic
-
Gears are progressively engaged, with a smooth transition in both torque and rpm among each gear.
- Each gear change takes Gear transition time (s) to smoothly shift from a gear to another.
- A minimum of Shift interval (s) time is enforced between two consecutive gear shifts.
- Automatic transmissions should use a Torque Converter instead of a standard clutch.
The Gear Ratios define the power ratio that is applied to the engine torque. If the first gear ratio is 3.84, this means that the torque at the output of the gearbox in first gear will be 3.84 times the torque applied by the engine. The rotational velocity will be 3.84 times slower as well.
Any number of gears and ratios can be configured for both forward and reverse gears. Standard cars typically have 4 - 6 forward gears and one reverse. Trucks may have 12, 18 or even more and several reverse gears.
Requirements for gear ratios are:
- Gear ratios of zero are not permitted. This is what Neutral gear is for.
- Automatic transmission and Auto-shift require the forward gear ratios to be sorted in decreasing order.
- Reverse gears are not automatically engaged. The automated modes engage the first reverse gear when required, but other reverse gears should be manually engaged via manual gear shift.
In order not to change gear up if the drive wheels have lost their traction, the Auto shift mode only engages the 2nd gear if the vehicle's speed is above the 2nd gear min speed (m/s) value.
The Park mode is characteristic of the Automatic transmissions, but it can be simulated in Manual transmissions as well (Allow Park mode).
Driveline #
Configure which axle(s) from the Axles section are driven and the transmission devices between the gearbox and the drive wheels.
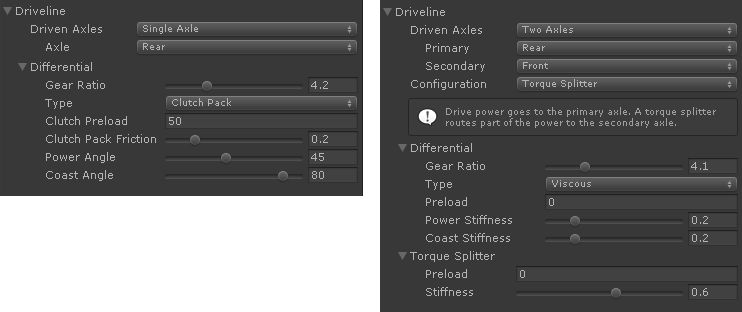
- Drive Axles: Single axle, two, three or four driven axles.
- Primary, Secondary, etc define the role of each driven axle, if applicable.
- Configuration: Specify the devices that are used in the transmission:
- Differential: Configure the Final Ratio here (Gear Ratio), and the type of the differential.
- Torque Splitter (Two Driven Axles): A device that transmits the drive torque to the Primary axle, but if this one slips, a portion of the torque given by the Stiffness parameter is routed to the Secondary axle.
More information on the differential types: Differential Block.
More information on the driveline configurations: Driveline Helper.
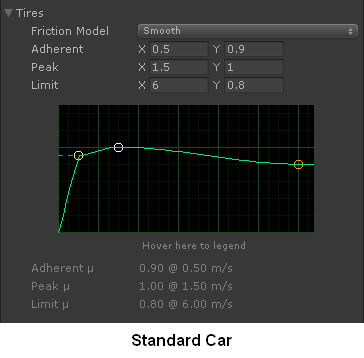
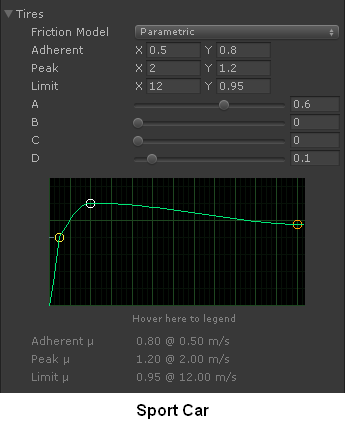
Tires #
Tire friction defines the grip of the wheels based on how much they are slipping.
- Adherent: friction when the tire doesn't slip.
- Peak: maximum friction of the tire, typically produced when it experiences a small amount of slip.
- Limit: if the slip increases beyond the peak point the friction is progressively reduced until reaching a minimum value.
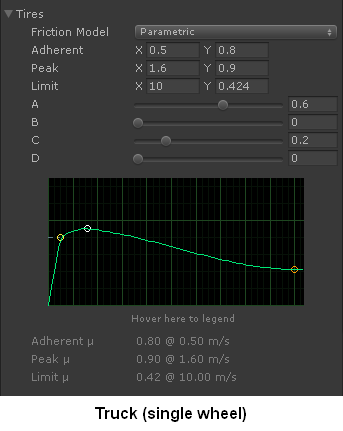
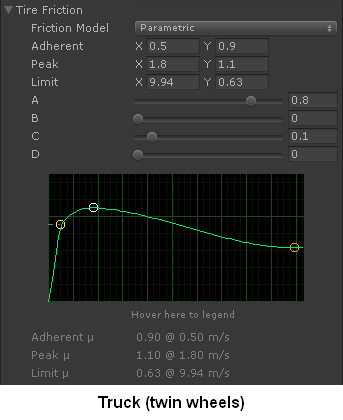
Examples:
More information: Tire block
Steering #
Configure the Maximum Steer Angle for the steering wheels.
Enabling Ackerman requires a reference Transform in the vehicle:
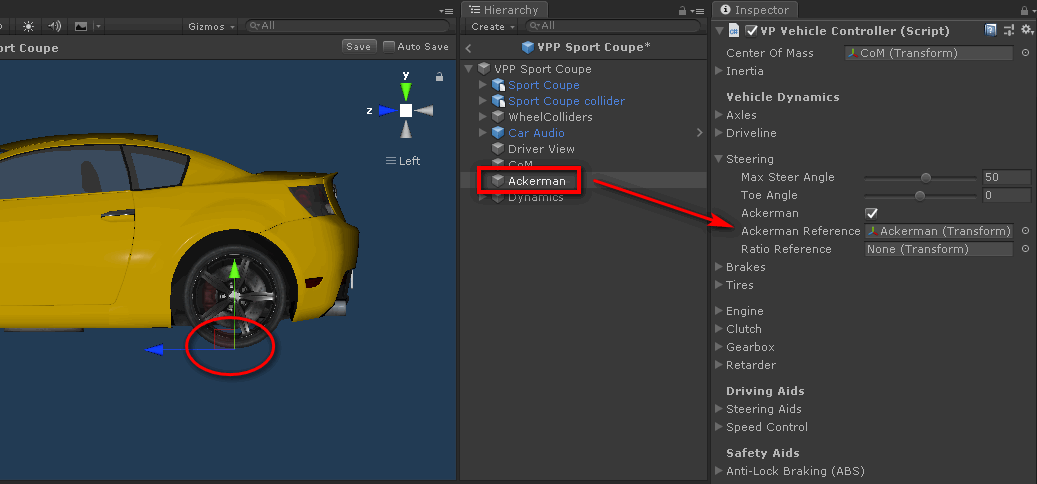
- Create a new child GameObject in the vehicle. Name it Ackerman.
- Configure it as Ackerman Reference in the Steering section.
- Configure the longitudinal position (Z) to the position of the rear axle.
- Leave the lateral position centered (X=0). The Y position is ignored.
This provides the standard Ackerman geometry. You may tweak it further by modifying the longitudinal position of the Ackerman reference:
- Configure more Ackerman by moving the reference towards the front of the vehicle.
- Configure less Ackerman by moving the reference towards the rear of the vehicle.
Brakes #
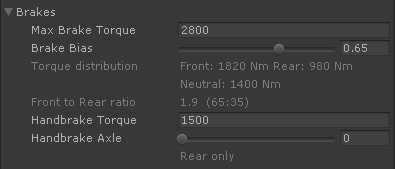
Good values for Max Brake Torque and Brake Bias (or Brake Balance) may be configured like this:
- Ensure ABS is disabled.
- Drive the car in a straight line and gain some speed (~100 km/h or 60 mph).
- Hit brakes (S or Down by default).
- If both front and rear wheels lock, reduce Max Brake Torque.
- If wheels don't lock, increase Max Brake Torque.
Repeat until finding a value of Max Brake Torque where only front or rear wheels lock, but not both. Then:
- If only front wheels lock, reduce Brake Bias slightly.
- If only rear wheels lock, increase Brake Bias slightly.
Repeat until finding a value of Brake Bias where both front and rear wheels lock again, but front wheels lock before real wheels.
Repeat the first procedure to refine the Max Brake Torque value. The final value should still lock all wheels, front wheels first.
More information on brakes and ABS: Brakes Helper
Driving Assists #
Steering Aids #
Enable Steering Limit in Sport mode. The movement of the steering wheel is then constrained to the range where the front tires can apply the maximum sideways grip.
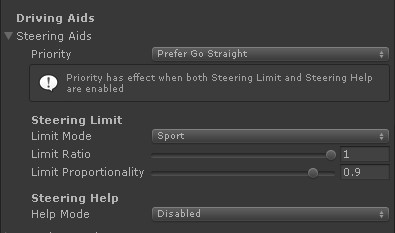
Rear drive (RWD) cars may experience a lot of oversteering at this point because rear wheels are heavily pushing and losing sideways grip. You may want to enable Traction Control (TCS) immediately afterwards (see below).
You may also enable Steering Help and configure Priority to either Go Straight or Drifting for simplified control and enhanced gameplay with keyboard / gamepad.
More information: Driving Aids Explained
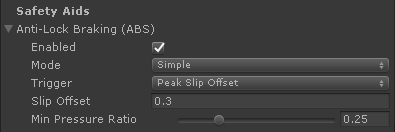
Safety Aids #
Default parameters are a good starting point in all these.
Info
Safety aids may trigger frequently when testing the car with keyboard or gamepad. This is normal, as you're pushing the car to its limits constantly (full throttle, full steer, full brakes).
Still, this gives you hints on where the setup should be improved. For example, ESC triggers on oversteer and understeer. You may improve these behaviors by configuring suspension to reduce the chances of the ESC to activate.
Anti-Lock Braking (ABS) #
Reduces brake pressure dynamically to prevent wheels to lock while braking.
Traction Control System (TCS) #
The Sport mode limits throttle when drive wheels slip beyond the tire's Peak friction to ensure they provide the maximum traction.
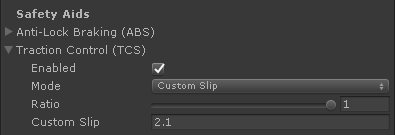
Hints for minimizing the activation of the TCS:
- Use the TCS Custom Slip mode with a value slightly beyond the tire's peak slip.
- Use a locking differential, or configure stiffer parameters for it.
- Configure stiffer suspension in the opposite axle. I.e. stiffer front suspension and/or front anti-roll bar in RWD cars. Use real-world techniques here.
- In manual transmissions with Disc Friction clutch: reduce the Torque Transfer value, so the clutch is allowed to slip slightly when switching gears.
Electronic Stability Control (ESC) #
Selectively applies individual brakes to specific wheels to compensate understeering / oversteering.
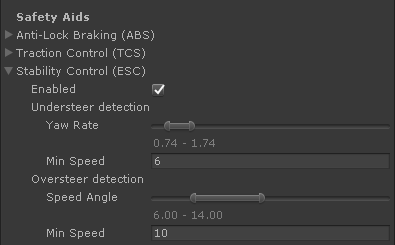
Hints for minimizing the activation of the ESC:
- Configure the ESC parameters to better fit the behavior of the vehicle. Use the Stability Control (ESC) section in the Telemetry window.
- Tweak the suspension to reduce the grip at the part that doesn't slide. I.e. if the car understeers (front wheels slide), a stiffer rear suspension should reduce the rear grip providing a better front-rear grip balance. Use real-world techniques here.
- Tweak the Inertia Bias parameter in the Inertia section of
VPVehicleControllerso it better fits the expected handling of the vehicle. - Configure the minimum speeds Min Speed to prevent premature activations. A procedure for finding good values is moderately accelerating (50%) while steering (limited steering enabled). Increase MinSpeed if ESC is suddenly activated above the current minimum speed.
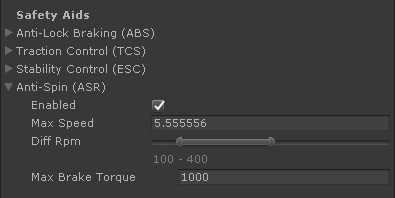
Anti-Spin Regulation (ASR) #
Works at low speeds by applying brakes to one drive wheel when it loses traction, allowing the other wheel to gain more traction and pushing the vehicle.
Add-on components #
If all the above is configured correctly then the car should be reasonably drivable at this point. That was configuring the main mechanical aspects and specifications of the vehicle.
Next part is configuring the vehicle dynamics and the handling. Most of it is made with add-on components.
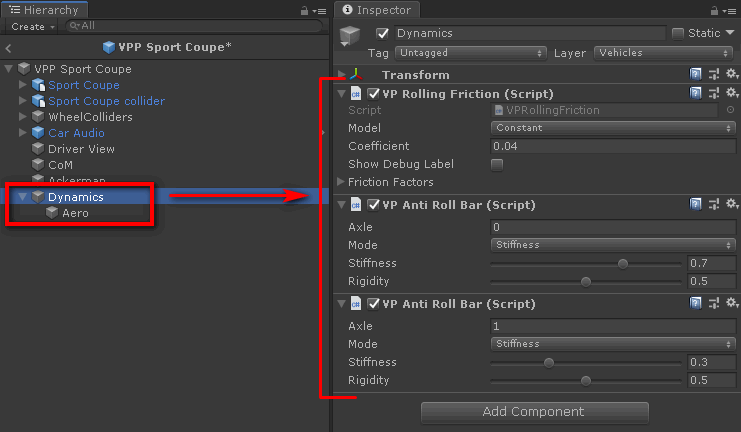
- Create a new child GameObject in the vehicle, name it Dynamics.
- Add the add-on components to it (except the
VPAeroSurfacecomponent, which require its own GameObject as described below).
Pro-Tip: Rule of thumb for tweaking car handling
- Handling at low-mid speeds is mainly affected by suspension and inertia.
- Handling at high speeds is mainly affected by aerodynamics.
You may apply real world techniques directly for configuring the car handling.
Rolling Friction #
VPRollingFriction produces drag in the wheels based on the force they're supporting. The default
value is a good starting point. Rolling friction together with aerodynamics define the vehicle's top
speed.
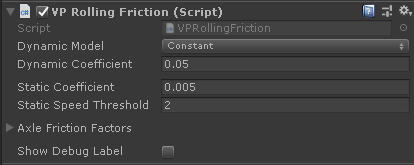
The static coefficient brings the car to a stop at low speeds (below Static Speed Threshold).
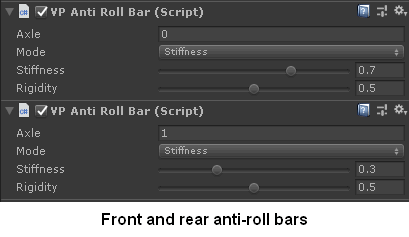
Anti-roll bars #
The VPAntiRollBar component links the left-right suspensions of an axle to reduce the body roll of
the vehicle and allow the momentum to shift quickly. This improves the responsiveness of the vehicle
when taking corners, of tweaking the car's balance in the turns.
Each VPAntiRollBar components instance affects a single axle specified by the Axle parameter.
In standard cars 0 is the front axle and 1 is the rear axle.
You may configure a single anti-roll bar to the front or to the rear axle, or add anti-roll bars to both axles. The decision depends on how you feel the handling of the car. As rule of thumb:
- A soft front end with a hard back end will tend to oversteer.
- A hard front end with a soft back end will tend to understeer.
Note that this is valid for the suspension stiffness as well (spring and dampers).
Aerodynamics #
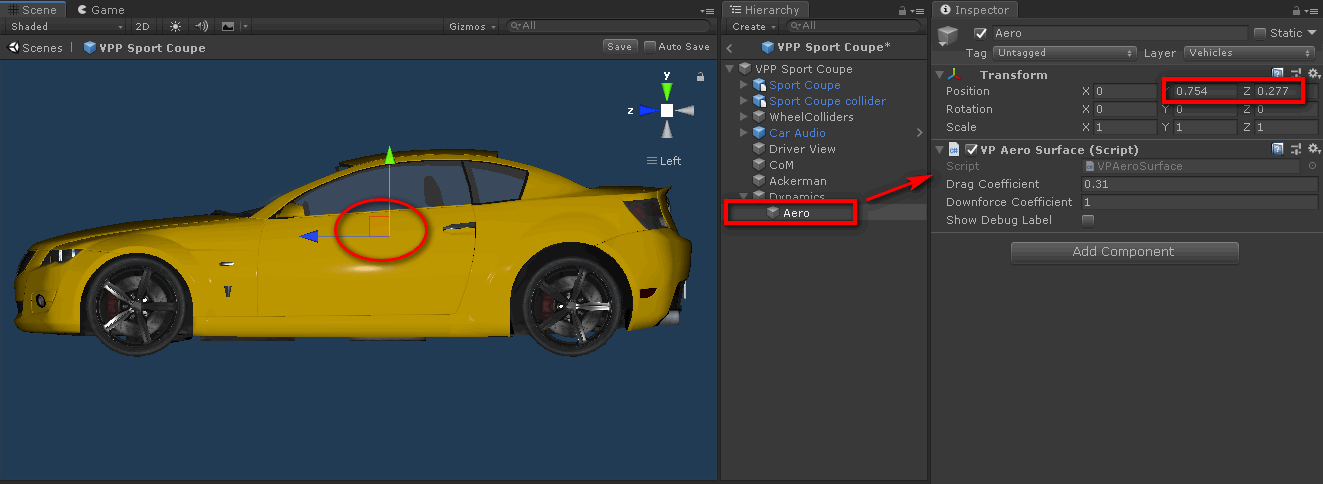
- Create a child GameObject in the vehicle, name it Aero. I'd make it child of the Dynamics GameObject, for consistency.
- Longitudinal position: around the middle of the front-rear axles..
- Vertical position: around the middle of an imaginary bounding box enclosing the vehicle.
- Add the component
VPAeroSurface.
- Drag Coefficient
-
Produces aerodynamic drag based on the speed squared. This value has the most influence in the top speed of the vehicle.
Theoretically, it's the aerodynamic coefficient of the car multiplied by the frontal area. A good value for standard cars is around 0.2-0.5.
In practice, you may drive the car in a long straight (VPP provides the prefab Flat straight 50 Km x 100 m) and tweak the value until the top speed matches the specifications.
- Downforce Coefficient
-
Produces aerodynamic downforce based on the speed squared. This is typically provided by the shape of the car and any spoilers it may have.
A good value for typical cars is around 0.1-0.4. Sport cars use 0.4-0.9 depending on their aerodynamic pack.
You may configure the aerodynamic behavior at high speeds by moving the longitudinal position of the Aero GameObject:
- Move Aero forward if the car understeers at high speeds. The increased downforce at the front part provides more grip at the front wheels.
- Move Aero backward if the car oversteers at high speeds. The increased downforce at the rear part provides more grip at the rear wheels.
Check out the Susp column in the Telemetry window (VPTelemetry component) to check out how the
downforce is compressing the suspension, and which part of the car is being pushed further.
Warning: watch the suspension compression
Ensure compression values as shown in the Telemetry never reach 1.0 at high speeds. Otherwise weird physics effects will occur. If the extra downforce caused by aerodynamics compresses the suspension beyond the limit then you need to increase the suspension spring rate in the affected wheels.
Advanced Tip: Front and Rear aerodynamics
If the car heavily relies on the aerodynamics (i.e. a formula racing car) then you may configure front and rear aerodynamics independently.
- Use two GameObjects with an
VPAeroSurfaceeach. - Put them at the longitudinal positions of the front axle and the rear axle, respectively.
- The vertical positions should be the middle of the height of the car the corresponding position.
You may then configure drag and downforce independently at each position.